Date: 08/05 2014
Duration of activity: 10.15 - 14.30
Group members participating: Pætur Askildsen, Christian Jegstrup Hansen, Søren Gregersen, Søren Ditlev and Alexander Rasmussen
Goal
The purpose of this lab session is to make an initial effort to come up with a description of the end course project that our group wants to do.
Plan
- Look at the list of projects, discuss the projects in the list of projects or consider new suggestions.
- For each project proposal that we discuss we will consider the hardware/software platform needed, e.g. number of NXT's, program on a PC, sensors, actuators etc.
- Furthermore, for each proposal figure out the overall software architecture and the software architecture on each component, e.g. a behaviour-based architecture on each NXT and a server architecture on a PC. Use the course literature as reference.
Results
Here follows a lists of projects considered and for each project: a short description of the project, the hardware/software platform to be used and the software architecture of each component. We will also try to point out the most difficult problems to be solved in each project.
Project proposal #1 - Self-balancing robot on 2 wheels, LegWay
Short description
A LegWay self-balancing 2-wheel robot which can be remotely controlled or/and can follow a line. Alternatively it could be controlled through coordinates send to the robot over bluetooth using the different interfaces and classes available in leJOS for localization and navigation.
Hardware / software platform to be used in the project
To build this project it would be obvious to use the robot build in lesson 5 where we managed to build a self balancing robot that could stand for minimum 3 minutes, link to video, using a PID-controller [12][13]. In lesson 5 we build the robot proposed by Philippe Hurbain [1] just modified with bigger wheels, and used the Java program written by Brian Bagnall [2] as a base for our balancing robot. In this self-balancing robot we used a light sensor to measure the position of the robot.
The robot from lesson 5 should be expanded with one additional light sensor if it should be able to follow a line, ideally two sensors to enhance the precision of the line following behavior. Using a gyroscope instead of a light sensor for balancing should also be tried.
If we want to control the robot through coordinates sent to the robot via bluetooth, we will have to implement bluetooth and use the leJOS navigation classes [3], specifically the Navigator.class. Relevant course literature will also here be [4], [5].
The most difficult problem(s) to be solved in this project
There are several things that are difficult in this project.
1) To build and program a stable self balancing robot, that can handle a bit of interference.
2) To make the robot able to move using a remote control while the robot keep balancing.
3) If we use the light sensor ( to make the LegWay balance and/or follow a line), it will be difficult to cope with the oscillating light sensor values caused by the oscillating robot as it constantly tries to keep itself balancing, we are convinced that the light sensor values will change with varying distance to the same surface.
End product we expect to present at the end of the project period
We want at least to get the robot to balance for a long time, and since we have already done this, this shouldn’t be too much of a problem. The next step would be to get it to balance more stable. When we have a stable balanced robot, trying to make it move by adjusting parameters is the next move, either through Bluetooth-communication and a small GUI at first or using a lego/xbox/other controller. Next up would be to get the LegWay to follow a line. If we get all this done, a last addition to the project could be to get the robot to navigate a space using the different interfaces and classes available in leJOS for localization and navigation.
Project proposal #2 - Self-Balancing Robot on a Ball
Short description
A self-balancing robot on a ball. It could be extended to be controlled by a joystick / arrow keys on a keyboard. It could also be extended to do obstacle avoidance by using an ultrasonic sensor. Another possible extension is route navigation, like explained for the LegWay balancing robot above.
Hardware / software platform to be used in the project
In this project we use a ball for the robot to balance on. We will have to implement a PID controller, where the constants will be chosen remotely using bluetooth communication. We will have to use
- Two NXT motors
- Two light or color sensors, or two NXT HiTechnic gyroscopes (one for x and one for y axis, as they are single-axis gyroscopes).
- A joystick.
- NXT Ultrasonic sensor.
If we want to extend the project with route navigation, we will use the leJOS navigation classes [3], specifically the Navigator.class and possibly course literature [4], [5].
The most difficult problem(s) to be solved in this project
The first problem here is obviously to make a robot that is able to balance steadily on a ball.
Another challenge will be to make the ballbot keep its balance while the robot is moving, whether this is done because we want to control the ballbot by using a remote control, if we want to implement obstacle avoidance through ultrasonic sensor or whether we want to navigate the robot using leJOS navigation classes.
End product we expect to present at the end of the project period
We hope at least to be able to get the a ballbot balancing, and when we succeed in that we will try to make it move by using input from a controller e.g. a joystick. If get through this checkpoint, making the robot do obstacle avoidance by using an ultrasonic sensor can be the next step. Using leJOS navigation classes to navigate the robot will our last step.
Project proposal #3 - Rubik’s cube solver
Short description
Construct a robot that can solve a rubik’s cube similar to the robots presented in [6]. A lot of attempts to solve a Rubik’s cube using Lego Mindstorms has been made the last 10 years, which makes it a classic challenge worth trying out.
Hardware / software platform to be used in the project
For a basic rubik's cube solving robot like the Mindcuber [8], we will need three NXT motors: One to control the color sensor, one to rotate the cube vertically and the last one to rotate it horizontally. The color sensor is used to detect the colors. The robot uses an ultrasonic sensor to detect if there is a cube present in the holder.
The most difficult problem(s) to be solved in this project
Find a construction that is able to hold the Cube steady, turn it in omni directions, while being able to manipulate the cubes individual sides. Designing software that is able to use the color sensor to identify how the cube should be manipulate.
Another possible challenge is to build our own robot and not just use the building instructions and code available on Lego’s own site for the MindCuber, made by David Gilday [7][8].
End product we expect to present at the end of the project period
At least a rubik’s cube solving robot. When this is done reducing the time with which the robot can solve a rubik’s cube will be pursued.
Chosen project - Project proposal #2 - Self-Balancing Robot on a Ball with a remotely controlled robot driving inside the ball
The reason for the choice
The ballbot offers challenges that we think could be fun to explore, both construction wise and code wise. Another advantage is that if we manage to get a ballbot to balance, it can easily be extended with a remote controller, avoidance of objects or route navigation.
After a talk with Ole Caprani we also chose to expand the goal of this project to also incorporate a robot which should drive inside the ball which the ballbot balances on. This robot inside the robot should be the one to be remotely steered instead of the ballbot.
A more detailed description of the chosen project
After further investigation of the problem domain we found the following information, presented in the text and links below.
We will need two gyroscopes if we use the HiTechnic NXT gyroscope as they can only detect 1 axis each; it contains a single axis gyroscopic sensor that detects rotation and returns a value representing the number of degrees per second of rotation, deg/sec [9]. A blogpost [10] however advises to use other gyroscopes than the HiTechnic gyroscope:
“Some gyro sensors, like the Hitechnic gyro for example, are seriously affected by changes in input voltage. As the NXT is battery powered this is a serious problem. Starting the motors of the NXT will result in a power drop and thus in a change in offset. There is a trick to avoid this if you have a sensor mux with an external power supply. Like this one from Mindsensors. In general I advise you to choose another gyro.”
Since others have build a Ballbout using HiTechnics gyroscopes, we however still chose to go with those [11].
References to guide our work include
- Different ballbots http://nxtballbot.blogspot.co.uk/
- Link to excell document for parameter calculations for the ballbot: http://ballbotexcel.blogspot.dk/
- Lejos Ballbot code example: http://code.metager.de/source/xref/lejos/classes/src_shared/lejos/robotics/navigation/Ballbot.java
- NXT ballbot building instructions and the report NXT Ballbot Model-Based Design - Control of self-balancing robot on a ball, built with LEGO Mindstorms NXT [11].
We found that there are several problems that need to be solved. First the construction of a frame that is able to support the ball, balance and encompass a motor is complicated, however we have found build instructions to help in this process [11]. The most challenging part will be to get the ballbot robot to actually balance. To get the robot to balance, we will program a PID-controller for the robot [12][13].
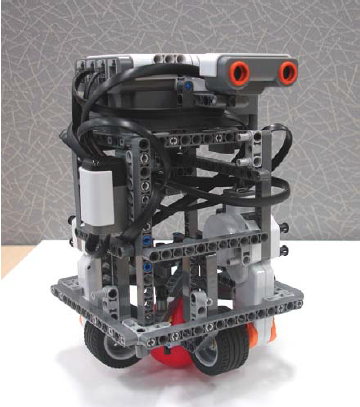
Figure 1: The NXT Ballbot which we plan to build, [11].
Plan for work with the end course project
Firstly we have to figure out whether we should use a light ball or heavy big ball, what the advantages and disadvantages are with both of the possible solution. As described in the section about this project, our first challenge is to get the robot balancing on the chosen ball. If we succeed in doing so, we will also try to implement a steering mechanism for the robot inside the ball, using either a joystick, the arrow keys on the computer’s keyboard, or coding a remote controller ourselves using bluetooth connection between two NXT’s making us able to drive the robot around in an arena like a circus clown on a one wheeled bike.
The sub-tasks to be done are:
- Making a little robot balance on a ball like in [11], using a PID-controller.
- Maybe try out different robot builds, ball sizes or ball weights.
- Building a little robot to be inside the ball on which the robot balances, which can be remotely steered.
- Thinking the 2 robots into a concept, e.g. to be presented on a conference stand. What would be fun for attendants to see / do?
References
[1] Philippe Hurbain, NXTway
The chapter contains a java program Sejway.java that can be used as a starting point for experiments with a self-balancing LEGO robot.
[4] Brian Bagnall, Maximum Lego NXTBuilding Robots with Java Brains, Chapter 12, Localization, p.297 - p.298.
[5], Java Robotics Tutorials, the ch. Enabling Your Robot to Keep Track of its Position. We could also look into ch. Programming Your Robot to Navigate to see how an alternative to the leJOS classes could be implemented.
[6] Videos of robots that solve a Rubik’s Cube, http://www.mindcuber.com
[7] Building instructions and code for the Rubik’s Cube Solver made by David Gilday: http://www.lego.com/en-gb/mindstorms/news/2012/april/have-your-own-robot-solve-a-rubiks-cube
[8] The MindCuber robot, http://www.mindcuber.com/mindcuber/mindcuber.html
[11] NXT Ballbot (Self-Balancing Robot On A Ball) Controller Design, Ballbot, Download including building instructions
[12] PID controller, wikipedia, http://en.wikipedia.org/wiki/PID_controller
[13] A PID Controller For Lego Mindstorms Robots, http://www.inpharmix.com/jps/PID_Controller_For_Lego_Mindstorms_Robots.html